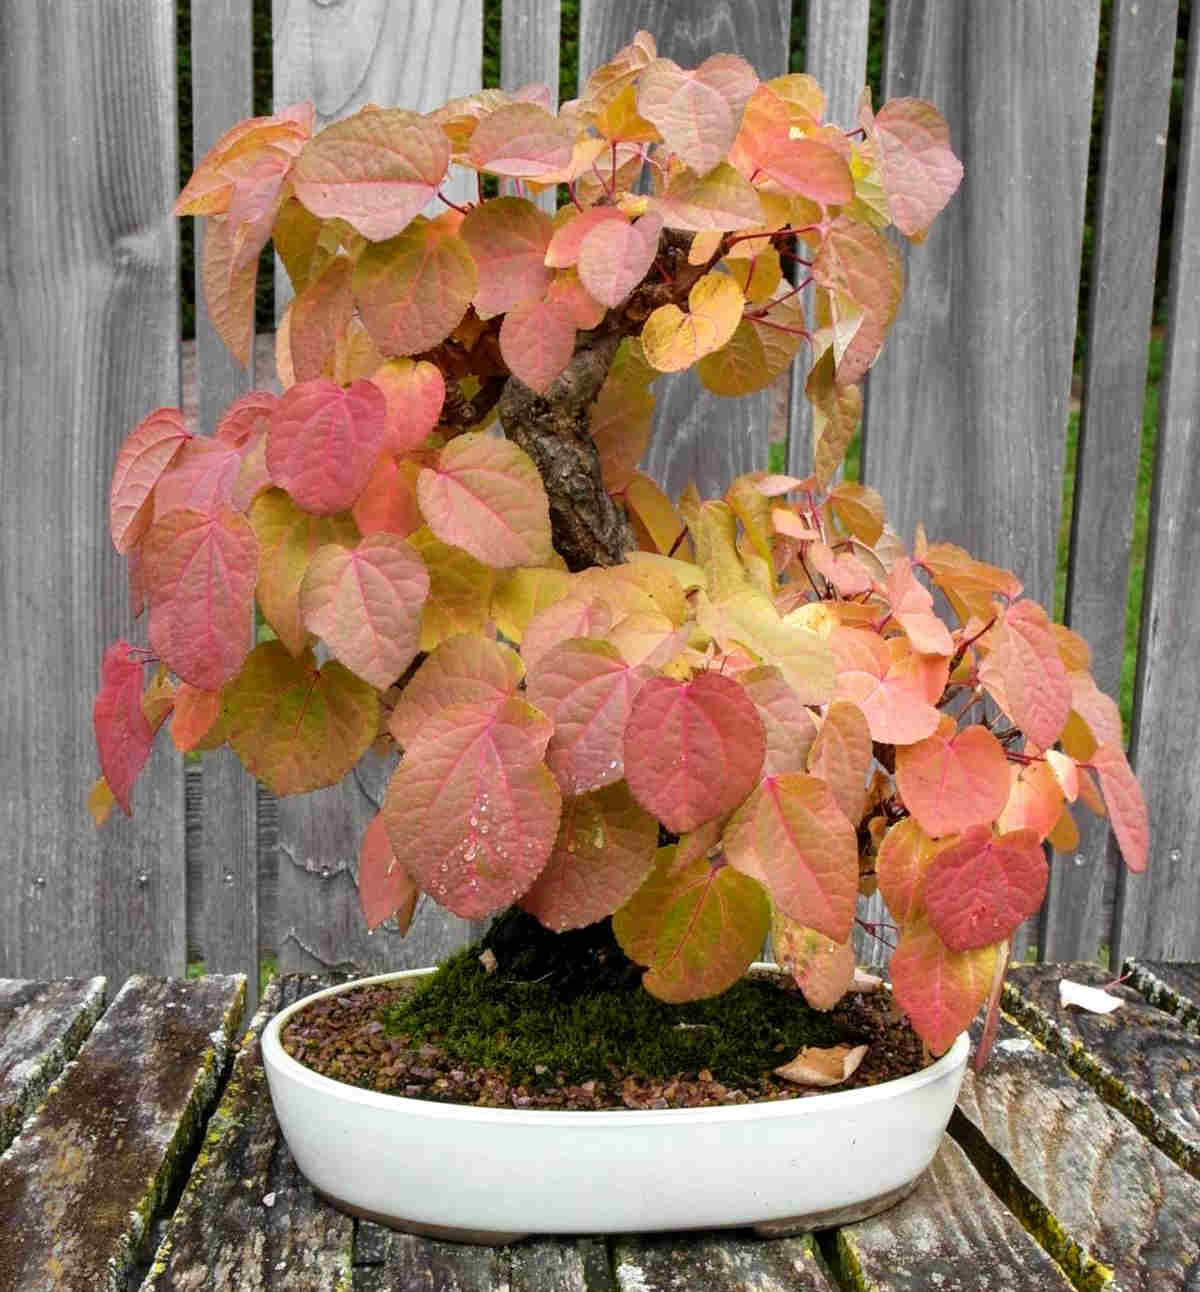
Cercidiphyllum, commonly called katsura, can be grown into bonsai that are particularly appealing in fall.
Katsura bonsai facts
Difficulty – difficult
Start from – older tree, katsura seedling or katsura cutting
Season of interest – fall color & fragrance
Cercidiphyllum katsura – not to be confused with the more common katsura maple – is rather difficult to train into a bonsai. However, its peachy-apricot fall colors combined with the delicious caramel fragrance make it a worthwhile endeavor!
There are three ways to grow Cercidiphyllum bonsai:
Seedlings may seem like a natural place to start, but the best practice to create a katsura bonsai is to start from a older tree or stump.
In nurseries, twisted or wounded specimens deemed too ugly to sell make perfect bonsai candidates. Usually they’re already at least three or four years old.
If you plan on starting from an old tree, jump directly to this section of the page:
Start with basal cuttings for a higher chance of success.
Sowing from seed takes an extra year or two compared to cuttings. However, it’s a great solution that gives you more leeway in shaping your katsura bonsai. You can wire and tweak branches into shape.
For both seedlings and cuttings, a key step to understand is that large trunks can only be reached with katsura planted in the ground.
Growth in the trunk of a tree is directly related to the volume of leaves and roots above and below ground. Large volumes require a thick layer (or growth ring) with lots of sap-channeling veins, whereas a few sparse leaves will only require growth as thick as a sheet of paper.
Consequently, the best practice to form and shape a Cercidiphyllum bonsai from small seedlings or saplings is to alternate two different periods.
The time slot available for forming branches is only a couple weeks to a month every year, especially for katsura:
Working on a seed-or-cutting katsura bonsai will require alternating between the soil and the work bench for two to five years.
At the end of spring, the main growth spurt has ended but wood is still tender.
With Cercidiphyllum, there’s a very high chance that this short 1 to 2 week-period will result in leaf drop. This is because the plant is very vulnerable to drought. Its first coping mechanism is “leaf abcission” (leaf drop).
Work will be made very easy if you follow the pot-in-pot technique for planting your future bonsai.
With this method, two growing pots are used that are only one size apart.
The outer pot is left in the soil at all times. The inner pot can be pulled out rather easily when needed.
It helps to condemn or block the bottom holes of both pots to ensure that roots only sprout out sideways and not down. This makes cutting roots off easier. However, make sure a few of the openings you care are level with the bottom, so that excess rain can drain out.
An added, crucial advantage of this technique is not to be overlooked. You can use the rim of the inner pot to attach and tether wire, slabs of wood, and other things. The structure used to shape the tree will stay with the tree until the next season.
After around five years of this treatment, the trunk will have thickened to a size large enough to be transferred to permanent bonsai pot.
Katsura has a wide and shallow root network. This usually translates in difficulties when transplanting. It’s difficult to not kill an uprooted katsura.
Every time the soil dries up, leaves fall and energy is expended to make new ones. If this happens too often, the tree will drain its reserves and die.
Transplanting to the final pot requires a few steps: culling the roots, cutting back unwanted main branches, and carefully preparing the pot.
Katsura tends to grow surface roots. Try to maintain this feature when preparing your bonsai.
Attach the root ball firmly to the pot.
On an old, thick Cercidiphyllum shrub, you can cut back branches.
Use various tools such as chisels, metal brushes, and small drills to work off portions of wood and shape the ends of branches.
On a seedling, start wiring the trunk in a harmonious manner.
Smaller branches are shaped in early or mid-summer, on softwood. After that, they tend to become brittle.
Make sure the pot has excellent drainage.
This bonsai is more difficult to care for than other bonsai.
It’s important to not let a katsura bonsai dry out.
Bonsai have a tiny amount of soil to draw nutrients from. It’s important to compensate spent nutrients regularly.
Because the bonsai is under duress, your katsura might not always bear flowers and fruits.
The key to making your Kastura tree a great bonsai is in the watering. As a bonsai, the root system is always a bit too small for comfort. Kastura is usually very vulnerable to lack of water, even when not grown as a bonsai.
 The typical response to lack of water is immediate shedding of all the leaves.
Learn to strike the right balance. You shouldn’t water too much, as this would trigger too much vegetation, but you shouldn’t also let it dry out too often!
Defoliation thus occurs rather naturally for Cercidiphyllum bonsai. In other bonsai species, it’s something occasionally forced on the tree to weaken it and make leaves smaller.
All the katsura varieties can be coaxed into a bonsai, but the Cercidiphyllum magnificum are naturally smaller and slower-growing. They’re a better choice, but don’t let anything stop you from trying out a Cercidiphyllum japonicum bonsai!
Katsura is especially beautiful in fall. Keep it in a shaded place during the rest of the year, but bring it out to shine when the leaves start turning golden pink!
can KATSURA tree be grown in a pond basket. I just received a three foot tall seedling when will be able to cut it down to BONSAI size.