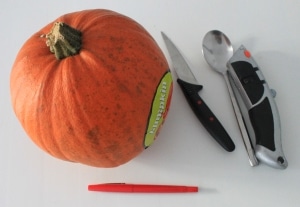
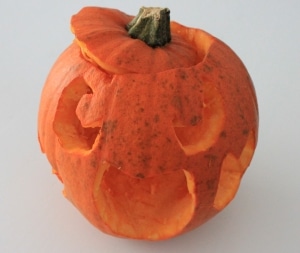
Mid-autumn 31st is Halloween! Hey, what if you celebrated it with the famous Jack O’Lantern pumpkin? Whether you have children or not, this is always a fun activity!Here are our tips on how to give your pumpkins a most original touch. Have fun!
Carving a Jack O’Lantern breaks down into six stages, and only some of them are safe for small hands. Use this table to share out the work before you start.
Who does what at each stage
Stage
What you do
Tool
Adult or child
Marking the lid
Clean the pumpkin, then draw a circle around the stem
Marker or felt-tip pen
Either
Cutting the lid
Cut around the circle at a 90-degree angle, then lift the lid off
Sturdy knife
Adult only
Hollowing out
Scoop out the flesh and seeds
Large, sturdy spoon
Children can help
Drawing the face
Mark out eyes, nose and mouth on the rind
Marker or felt-tip pen
Either
Cutting the face
Cut the rind along the lines, then refine the details
Knife and blade cutter
Adult only
Lighting up
Set the candle in the middle and light it at dusk
Flat candle
Adult lights it
Share the stages out this way and everyone gets a turn without anyone getting cut.
Carving a pumpkin step by step
Knife and cutter: the cutting stages are an adult’s job
Step 1:Clean the pumpkin well to remove any dirt. Use the pen or marker and draw a circle around the stem of the pumpkin. This opening is where the pumpkin will be emptied of its seeds and flesh. It must be large enough to comfortably maneuver the spoon in hand around.
Step 2: Cutting this lid out is a delicate step. If this activity is done with kids, this portion of the activity must be done by an adult. It is important to be very careful not to cut yourself. Take a knife and place it at a 90-degree angle to the pumpkin’s surface. This particular angle will keep the hat from falling in the hole once the pumpkin is hollowed out! Proceed slowly around the drawn circle, sinking the knife deep inside the pumpkin. After having cut around the perimeter, delicately remove the lid and detach any pulp that was attached to it.
Step 3: Grab the spoon and start scooping out the pumpkin flesh and seeds. This simple and safe step can be where children get a go. Take note that the pungent smell that sometimes emanates from the inside of the pumpkin may make some persons feel indisposed, particularly children.
Eyes, nose and a wide mouth: the simplest design of all
Step 4: Again with the felt-tip pen or marker, draw the designs that your Jack O’Lantern should look like. The simplest is just to have eyes, a nose and mouth, that’s all. On our part, we chose to make a scary character with eyes, a wide open mouth and hands on the cheeks.
Step 5: Again, this part of cutting the rind with the knife following the line is an adult’s job. Use the blade cutter for the smaller details or to smoothen edges out. Stay very concentrated. Proceed in a slow and steady manner so as not to cut yourself.
Step 6: Take a candle and place it at the center of the pumpkin. Come dusk, ask an adult to light it. The magic will start a few seconds later! Scary, isn’t it?
Image credits (edits Gaspard Lorthiois):
Unsplash: Taylor Foss
own work: Laetitia Devillars
Written by Gaspard Lorthiois | Loves helping out, especially when it comes to growing things. Worked in herbal medicine, runs a farm, and dabbles in tech. Master's degree and engineer.